

[op_liveeditor_element data-style=””]
LESSON: The Pingulfing Bar
[/op_liveeditor_element]
[op_liveeditor_element data-style=””][text_block style=”style_1.png” align=”left” font_size=”16″ font_font=”Montserrat” font_color=”%237e7e7e”]The Pingulfing bar is a Pin Bar/ Engulfing Bar combo setup that can be incredibly powerful.
The reason the Pingulfing bars can be super powerful Price Action setups and trigger for entries, is because they are combining two very powerful signals to make one.
The makeup of a Pingulfing Bar can confuse traders, but after reading through this section it should become clear as to what is needed for a Pingulfing bar to be valid.
I have already gone through in depth and taught you about the price action story and the pin bar and so I will try and move through this with not much fluff so we can get to the next module, but giving you exactly what you need.
What Exactly the Pingulfing Bar is?
The Pingulfing Bar is a reversal signal and should always be traded as a reversal from swing highs and lows.
This is not a signal that should be played as a continuation pattern.
MAJOR NOTE:
Unlike Pin Bar’s the Pingulfing Bar does not need to open and close within the previous candle, but it must close fully engulf at least 1 previous candle.
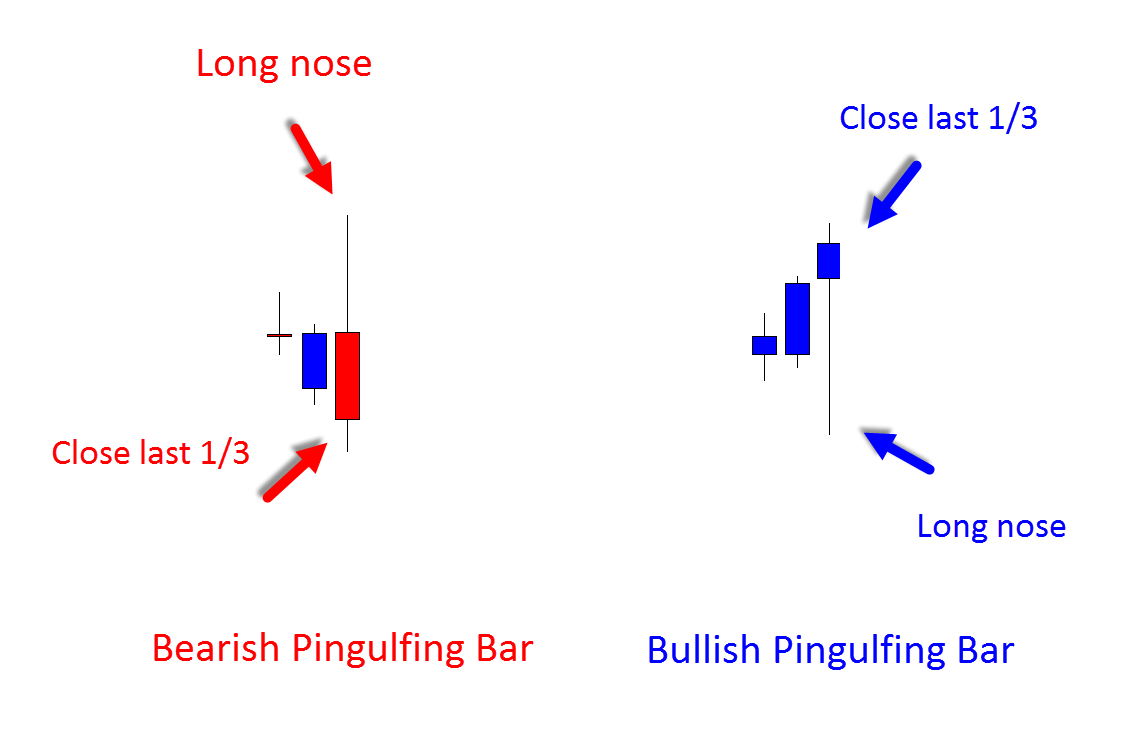
The Pingulfing Bar is at minimum a two candle signal and should have the following:
- Engulf at least 1 previous candle. This includes all the wicks and body.
- Have a long nose/wick that engulfs rejects higher/lower price like a Pin Bar’s nose.
- Price must close in the last 1/3 of the desired trade direction.
There is no rule on how big the wick has to be unlike the Pin Bar. The wick may only be half the size of the whole candle but as long as it engulfs the previous candle completely it is a valid Pingulfing Bar.
Examples of the Pingulfing bar are below:
Note how price for the bullish setup closed in the last upper 1/3 of the candle and for the bearish setup price closed in the bottom 1/3 of the candle. This is very important! We need to see that momentum in the direction we are looking to trade.
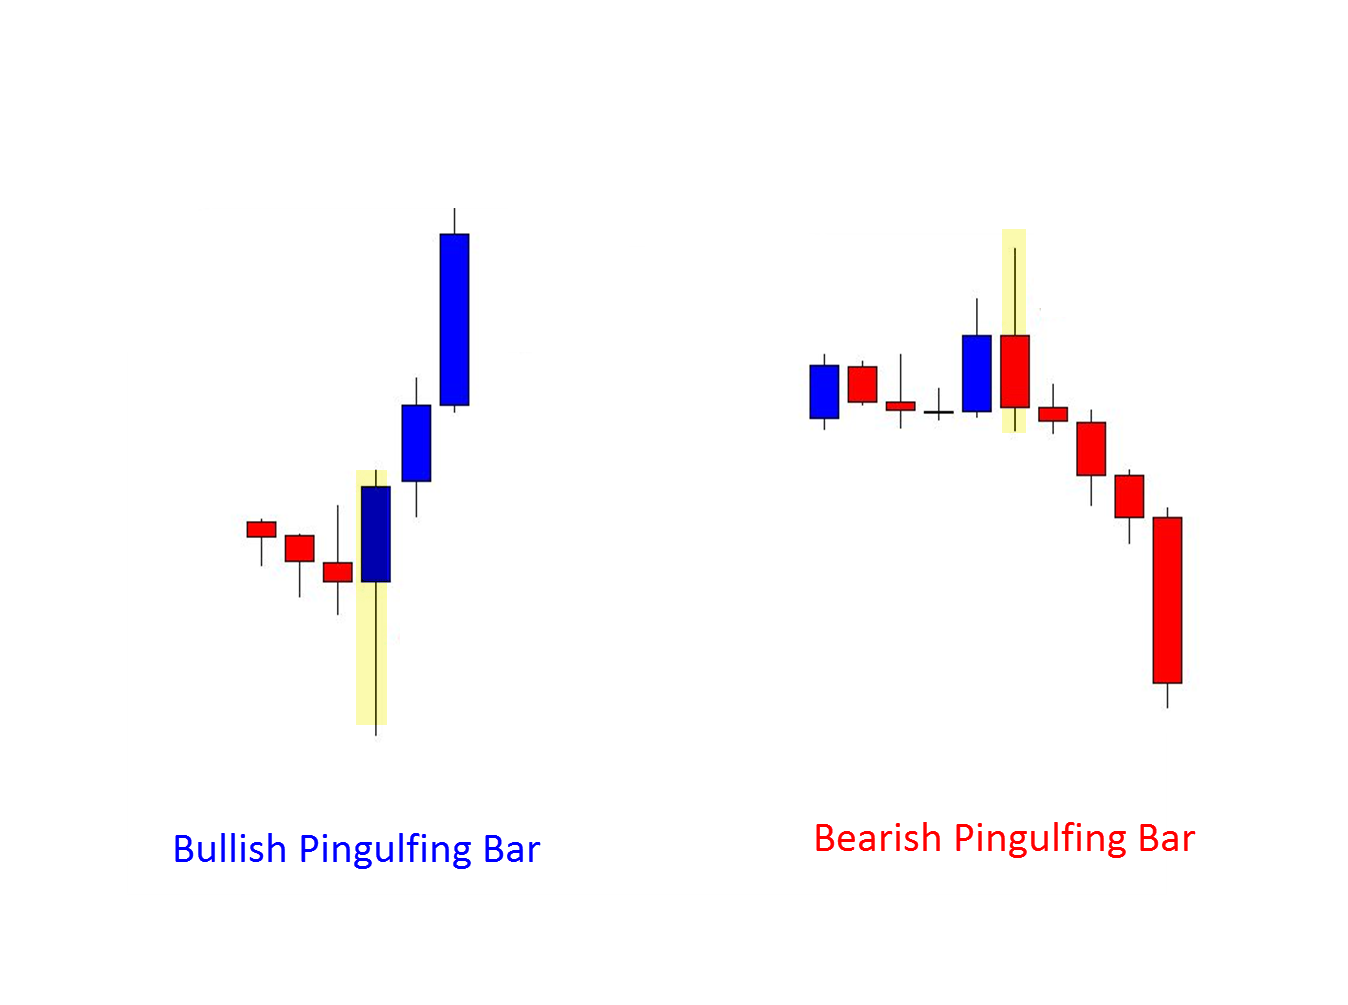
Below are two examples of Pingulfing Bars on a chart. Notice how Pingulfing Bars can be all different shapes and sizes but as long as they meet the trade criteria they can be powerful signals.
 [/text_block][/op_liveeditor_element]
[op_liveeditor_elements][/op_liveeditor_elements]
[op_liveeditor_element data-style=””]

[/op_liveeditor_element]
[op_liveeditor_element data-style=””][text_block style=”style_1.png” align=”center” font_size=”25″ font_font=”Source%20Sans%20Pro” font_style=”bold”]
Module Eight
[/text_block][/op_liveeditor_element]
[op_liveeditor_elements][/op_liveeditor_elements]
[op_liveeditor_element data-style=””][text_block style=”style_1.png” align=”left” bottom_margin=”10″]Duration: 6 mins[/text_block][/op_liveeditor_element]
[op_liveeditor_element data-style=””][text_block style=”style_1.png” align=”left” bottom_margin=”10″]Course Progress:[/text_block][/op_liveeditor_element]
[op_liveeditor_element data-style=””]
[/op_liveeditor_element]
[op_liveeditor_element data-style=””]
[/op_liveeditor_element]
[op_liveeditor_element data-style=””][text_block style=”style_1.png” align=”center” top_padding=”6″]« Previous Lesson[/text_block][/op_liveeditor_element]
[op_liveeditor_elements][/op_liveeditor_elements]