

Engulfing Bar’s as Continuations
MODULE 2
[op_liveeditor_element data-style=””]
LESSON: Engulfing Bar’s as Continuations
[/op_liveeditor_element]
[op_liveeditor_element data-style=””][text_block style=”style_1.png” align=”left” font_size=”16″ font_font=”Montserrat” font_color=”%237E7E7E”]The next two sections are going to cover how you can get into the market from positions that are not swing highs and lows.
This is going to open up a whole new section of the market and whole other avenue or trading opportunities.
Whilst the very best value trades will always be placed from swing points that are at strategic areas within the trend, there are also ways that you can enter the market when it is clear price is going in one direction.
NOTE: You need to be very picky in the continuation setups you take and the ones you pass on and adhere to the rules we are about to go through.
These next two sections may confuse some people because I am very firm in getting new traders to only play engulfing bars from pullbacks. The reason for this is the very best risk reward and also minimum risk trades are played from these areas.
Trading without pullbacks can produce many false signals and to the new trader they can find themselves entered into trades when the market is about to turn against them.
The basics of the engulfing bar and what makes the structure has been covered in the price action course #1. If you need to freshen up please refer back to it. We are using the same formation with this entry method however the key difference is where the engulfing bar forms.
Instead of looking for the engulfing bar from pullbacks to key levels we are looking to enter with the current move and enter looking for price to continue.
The very best continuation engulfing bars will be formed when there is a strong bias in the market either way. We have to be very careful that we are not entering into continuation engulfing bars when the market is ranging. This is a signal that should be played only when the market is moving strong in one direction.
Trading of the continuation engulfing bar should be on:
- Daily charts
- 4hr Charts
EXAMPLE CHART #1:
An example of a continuation engulfing bar is below. Notice on this example how price was already moving lower, all the trader would be looking to do is to get into the already existing move lower. Also notice how once the lows of the BEEB were broken price raced lower.

The most common way traders get themselves into trouble when playing this setup, is trading straight into the key support or resistance areas. This can be quite dangerous because price is likely to break the engulfing bar and turn right against you.
Remember because this is not from a value area the longer a move goes on in one way the closer it gets to retracing. All markets move up and down and never will they go in a straight line!
CHART EXAMPLE #2:
An example of trading right into a key area is below. Notice how price has found support in this downtrend and then price formed a BEEB trading straight into this proven support area. We need to be very careful of the levels we are trading close by and into.
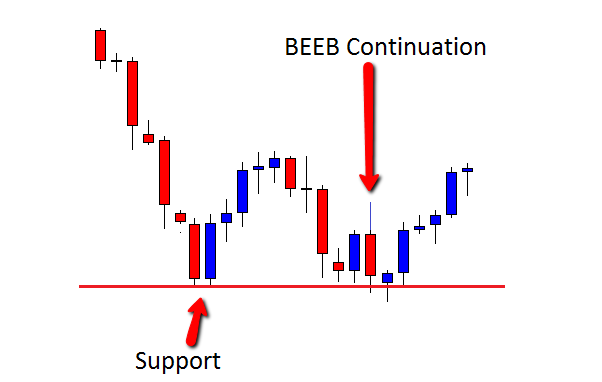
CHART EXAMPLE #3:
The next example is of BUEB forming in a range. This is the type of signal we have to be wary of not getting sucked into. We need to see our continuation engulfing bars forming in a free flowing market.
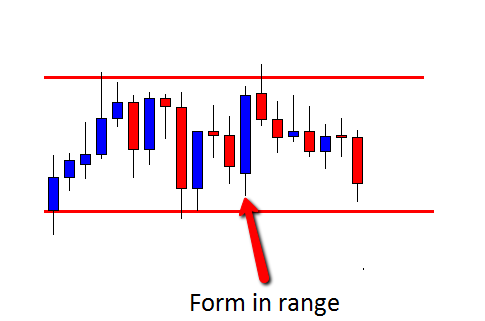
CHART EXAMPLE #4:
Two examples of A+ continuation engulfing bars are below. The first is an example of a BUEB in an uptrend. Notice how this market is free flowing for both the BUEB and also the BEEB and not trading into and key areas. The key to both these trades was there was plenty of space to move into.
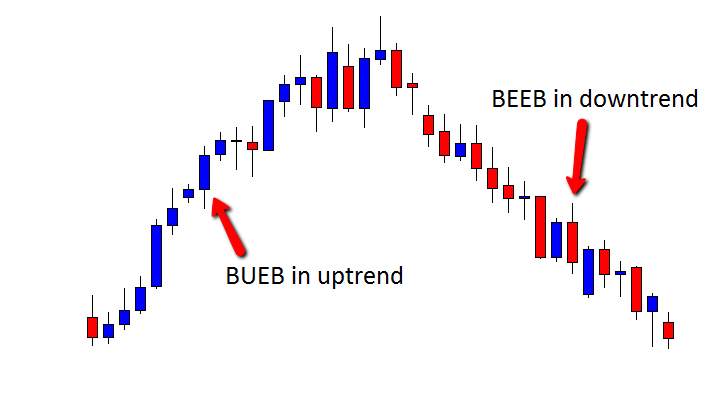
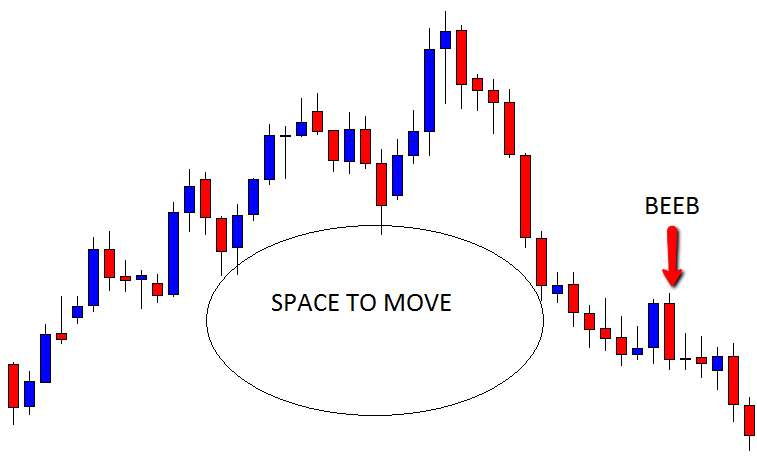
CHART EXAMPLE #5:
The last example is of a continuation BEEB. Once again the key thing to note is all the space that this trade had to fall into.
There was not a whole heap of traffic that was going to halt this markets fall any time soon.
The entry on the continuation engulfing bar should always be when the engulfing bars high or low breaks. We need to see price confirm the move and trend continuation by confirming the signal.
The stop on this setup should be played how it is taught in the price action course.
The safest and most conservative stop is going to be the other side of the engulfing bar and on occasions when price allows it you can use price to act as a barrier between price and your stop level.
[/text_block][/op_liveeditor_element]
[op_liveeditor_elements][/op_liveeditor_elements]
The Advanced Setups and The Major Areas You Need to Pay Attention to:
[op_liveeditor_element data-style=””]

[/op_liveeditor_element]
[op_liveeditor_element data-style=””][text_block style=”style_1.png” align=”center” font_size=”25″ font_font=”Source%20Sans%20Pro” font_style=”bold”]
Module Two
[/text_block][/op_liveeditor_element]
[op_liveeditor_elements][/op_liveeditor_elements]
[op_liveeditor_element data-style=””][text_block style=”style_1.png” align=”left” bottom_margin=”10″]Duration: 20 mins[/text_block][/op_liveeditor_element]
[op_liveeditor_element data-style=””][text_block style=”style_1.png” align=”left” bottom_margin=”10″]Course Progress:[/text_block][/op_liveeditor_element]
[op_liveeditor_element data-style=””]
[/op_liveeditor_element]
[op_liveeditor_element data-style=””]
[/op_liveeditor_element]
[op_liveeditor_element data-style=””][text_block style=”style_1.png” align=”center” top_padding=”6″]« Previous Lesson[/text_block][/op_liveeditor_element]
[op_liveeditor_elements][/op_liveeditor_elements]
[op_liveeditor_element data-style=””]
Action Steps & Downloads / Links
[/op_liveeditor_element]
[op_liveeditor_element data-style=””]

Watch COEB Video
[/op_liveeditor_element]

[op_liveeditor_elements][/op_liveeditor_elements]