
[op_liveeditor_element data-style=””]
LESSON: Managing With Trend
[/op_liveeditor_element]
[op_liveeditor_element data-style=””][text_block style=”style_1.png” align=”left” font_size=”16″ font_font=”Montserrat” font_color=”%237E7E7E”]Trading with the trend is my favorite position (and I highly encourage it to be yours also) and also where I aim to make the biggest risk reward trades.
Trading with the trend and / or momentum increases the chance of the trade being a winning trade and that winner being a big risk reward winner.
When trading with the trend I will normally manage less tightly than if I was trading in a range or against the trend. When trading with the trend in our favor the first areas are more likely to break due to the overwhelming move in one direction.
NOTE: All of these things are factors you want to be taking note of for your trading plan!
Big Runners
The trades that turn into runners will generally be the trades that are made with the trend direction. With this in mind, this is what I plan for. You have to be realistic. There is no point trading for large risk reward trades in a range or against the trend because the chances are high price will turn on you.
The type of market you are trading in is key!
An example of how I may manage a trade with the trend is:
- Open 3 positions – The last positions I will be looking to trail the stop for a runner
- Unlike range trading the first support or resistance area is not where I will take profit and move to break even
- I will take first profit off at target 1 and move to break even (normally a support or resistance zone that price may turn from)
- Second position will be taken off at target 2
- Third positions will be trailed using one of the methods already discussed
Keep in mind whilst these are examples of set rules, things can change. All trades are different and we need to manage the best way according to the situation. An example of this is the first target may represent a very strong support or resistance area and also a very good risk reward. We may decide to make this our target 1 and 2 and take two positions off.
CHART EXAMPLE #1:
An example of how I may manage a trade with the trend is below. We had a close first support area below. Because this was with the trend I wanted to give this trade a little more room to move and be a bigger risk reward trade so I did not move to breakeven at the first support area. If I had of moved to breakeven I would have been stopped.
Price then turned back lower and hit my target #1 and then target #2. After these targets were hit my last positions would have been trailed looking for a trade that is a runner.
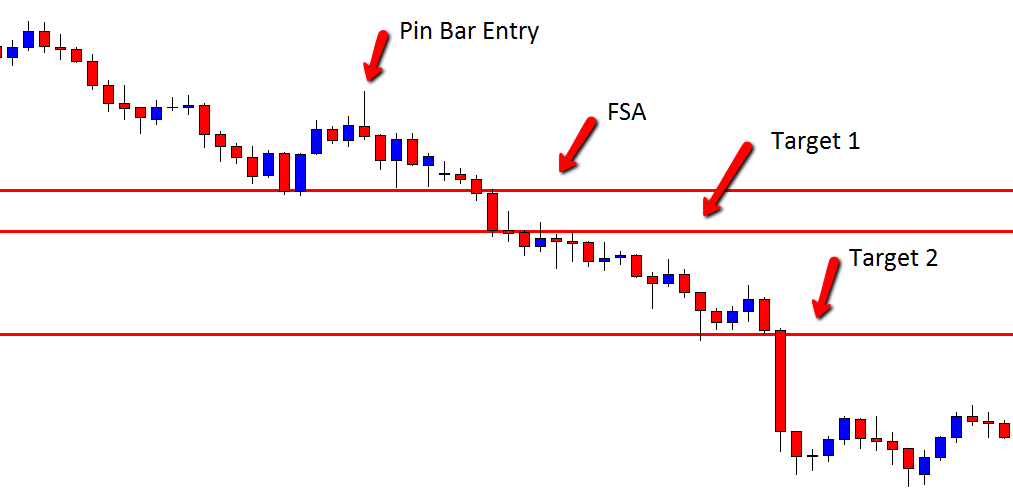
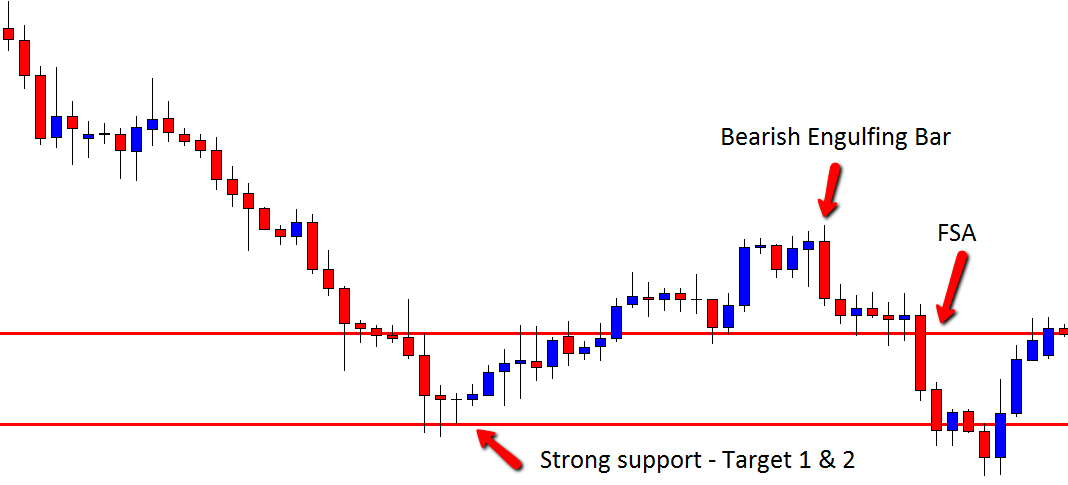
CHART EXAMPLE #2:
An example of how sometimes we need to be flexible is below. This trade was a bearish engulfing bar with the trend. Note that the first target was a strong support level and also a very good risk reward for this trade. Instead of this being only the first target we could make a change and decided we will take both targets #1 and #2 as profit off at this area. Please note once again, if we had of moved to break even at the first support area we would have been stopped in this trade.
 [/text_block][/op_liveeditor_element]
[op_liveeditor_elements][/op_liveeditor_elements]
[op_liveeditor_element data-style=””]

[/op_liveeditor_element]
[op_liveeditor_element data-style=””][text_block style=”style_1.png” align=”center” font_size=”25″ font_font=”Source%20Sans%20Pro” font_style=”bold”]
Module Five
[/text_block][/op_liveeditor_element]
[op_liveeditor_elements][/op_liveeditor_elements]
[op_liveeditor_element data-style=””][text_block style=”style_1.png” align=”left” bottom_margin=”10″]Duration: 12 mins[/text_block][/op_liveeditor_element]
[op_liveeditor_element data-style=””][text_block style=”style_1.png” align=”left” bottom_margin=”10″]Module Progress:[/text_block][/op_liveeditor_element]
[op_liveeditor_element data-style=””]
[/op_liveeditor_element]
[op_liveeditor_element data-style=””]
[/op_liveeditor_element]
[op_liveeditor_element data-style=””][text_block style=”style_1.png” align=”center” top_padding=”6″]« Previous Lesson[/text_block][/op_liveeditor_element]
[op_liveeditor_elements][/op_liveeditor_elements]