
[op_liveeditor_element data-style=””]
LESSON: Trading as Reversals and NOT Continuations
[/op_liveeditor_element]
[op_liveeditor_element data-style=””][text_block style=”style_1.png” align=”left” font_size=”16″ font_font=”Montserrat” font_color=”%237e7e7e”]In the advanced course we do go into breakouts and continuations and how to play them. These are the most reliable and can also be some of the most powerful, but the key to them is where they are played from on the chart.
Reversals are NOT continuations and the reason I put an emphasis on the NOT will be clearer down below.
It is super important where reversal signals are traded from and this is why the clear definition needs to be made between the continuation and reversal signal. As we have already discussed; with ALL reversal signals traders are picking price to reverse.
In other words; if a trader was to trading a bullish reversal signal, they would be trading it after price had moved lower because they are picking price to reverse.
Concrete Image on What to do and NOT to do
This lesson I am going to take you through some charts to give you some clear examples of reversals so you have no doubt of EXACTLY what a reversal and swing point looks like so that we can move forward into the triggers signals and you will have an absolutely concrete picture in your mind of where you should be looking for your trades in the market!
With continuation signals, traders are looking for price to continue in the same direction. If price is moving lower and then pauses, the trader would get into a trade looking for the market to continue lower with the ‘continuation’.
What the trader would not want to do is trade a reversal signal at this low and then look for price to continue going lower. Instead of picking price to reverse like traders need to, that would be taking a reversal from a low and looking for it to go lower, or trading a reversal as a continuation.
The best way to explain this is with chart examples as I know these help you.
Chart Example #1:
The first chart below is showing how the reversal should NOT be traded as a continuation. This chart shows price has moved lower and then fires off a pin bar.
Notice how this pin bar is at the low after price has moved lower. If a trader enters this pin bar they are entering a reversal as a continuation, or in other words price has moved lower and they are looking for price to go from a low point to even lower point.
What the trader should be doing is picking price to reverse. Instead of entering this pin bar here, the trader should be entering this same pin bar after price has moved higher into a swing high and then they would then be picking price to “reverse”.
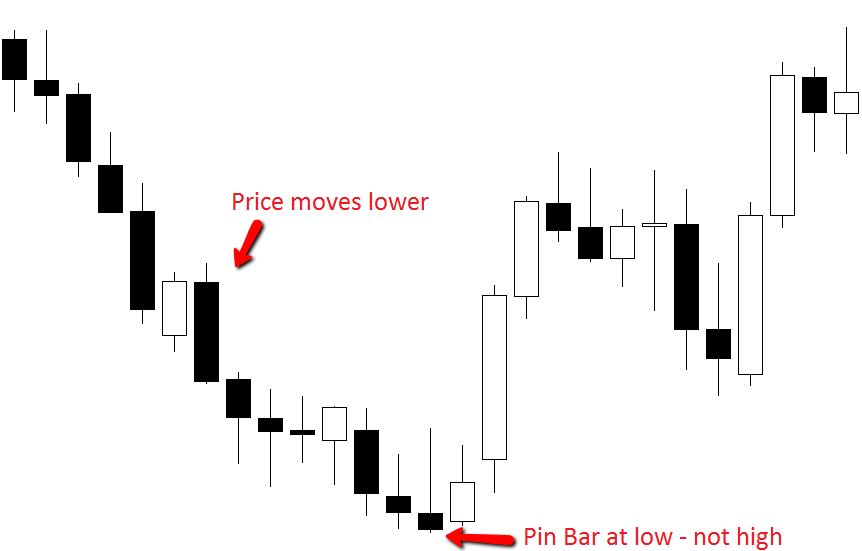
Chart Example #2:
The next chart below shows exactly what you should be looking for with your reversals. Notice how price has moved higher before firing off a large pin bar reversal.
If you were to take this pin bar you would be picking price to “reverse” lower.
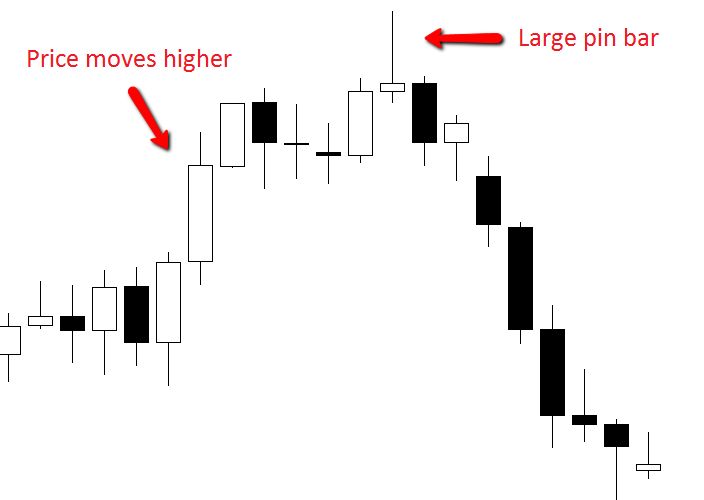
Chart Example #3:
The next chart example is of a bullish engulfing bar.
To correctly play the engulfing bar as a reversal, you must be picking price to reverse, which means you must be trading after price has made a move in either direction.
For this example; price has made a move lower and then fired off the bullish engulfing bar (BUEB). This would be a valid reversal trade because price has moved lower and then fired off the reversal signal (engulfing bar) and the you would be entering picking price to reverse higher.
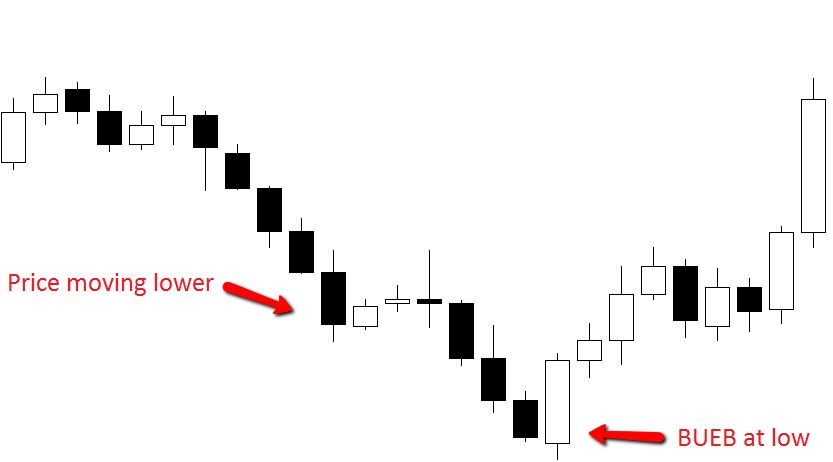
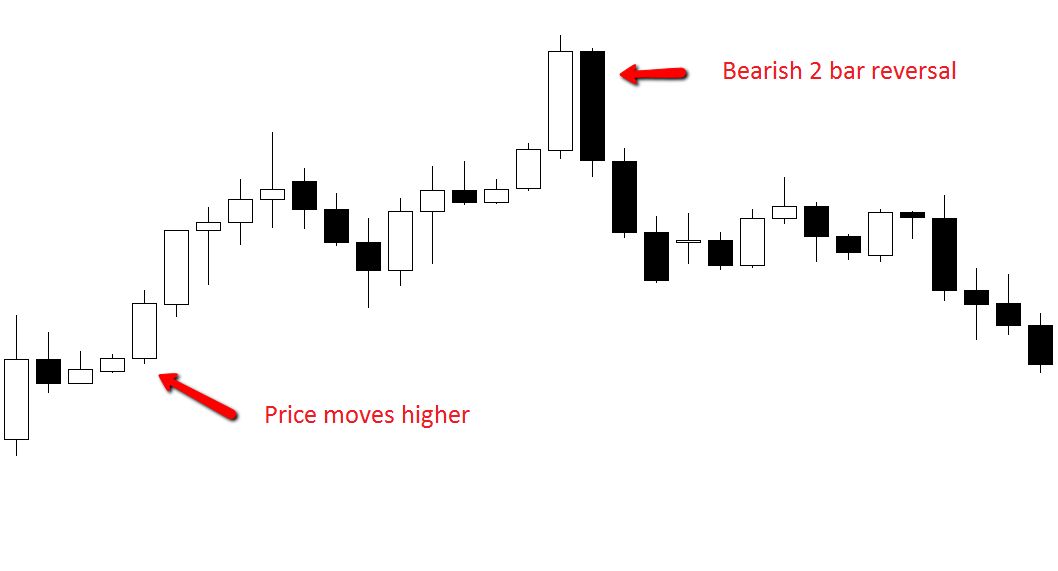
Chart Example #4:
The last example is a solid example of what you should be looking for with your 2 bar reversals.
Notice this bearish 2 bar reversal formed after price had moved higher. Trading this 2 bar reversal would be picking price to reverse rather than as a continuation and that’s exactly what we are looking to do with all reversal signals.
 [/text_block][/op_liveeditor_element]
[op_liveeditor_elements][/op_liveeditor_elements]
VIDEO: Hunting A+ Trades at Daily Swing Reversal Points on Smaller Time Frames (and how you can create a ton of space doing so…)
[/text_block]
[op_liveeditor_element data-style=””]

[/op_liveeditor_element]
[op_liveeditor_element data-style=””][text_block style=”style_1.png” align=”center” font_size=”25″ font_font=”Source%20Sans%20Pro” font_style=”bold”]
Module Five
[/text_block][/op_liveeditor_element]
[op_liveeditor_elements][/op_liveeditor_elements]
[op_liveeditor_element data-style=””][text_block style=”style_1.png” align=”left” bottom_margin=”10″]Duration: 22 mins[/text_block][/op_liveeditor_element]
[op_liveeditor_element data-style=””][text_block style=”style_1.png” align=”left” bottom_margin=”10″]Module Progress:[/text_block][/op_liveeditor_element]
[op_liveeditor_element data-style=””]
[/op_liveeditor_element]
[op_liveeditor_element data-style=””]
[/op_liveeditor_element]
[op_liveeditor_element data-style=””][text_block style=”style_1.png” align=”center” top_padding=”6″]« Previous Lesson[/text_block][/op_liveeditor_element]
[op_liveeditor_elements][/op_liveeditor_elements]
[op_liveeditor_element data-style=””]
Action Steps & Downloads / Links
[/op_liveeditor_element]
[op_liveeditor_element data-style=””]

Watch Video
[/op_liveeditor_element]
[op_liveeditor_element data-style=””]

Complete Module Test
[/op_liveeditor_element]
[op_liveeditor_elements][/op_liveeditor_elements]
[/custom_html][/op_liveeditor_element]
[op_liveeditor_elements][/op_liveeditor_elements]