
[op_liveeditor_element data-style=””]
LESSON: FRA – First Resistance Area
[/op_liveeditor_element]
[op_liveeditor_element data-style=””][text_block style=”style_1.png” align=”left” font_size=”16″ font_font=”Montserrat” font_color=”%237e7e7e”]The first Resistance area refers to the first area our trade may struggle, stall or find Resistance and possibly turn and retrace on the trader.
This first area of Resistance may be made up of a really solid and proven area or it may be just the few previous candle highs or lows. Depending on how important the area is depends on how we might manage our trade.
As we just discussed and I went through how absolutely crucial it is for you…
When a trade goes to these areas we have 4 choices:
- Move the whole position to a break even trade
- Move half to break even and take half profit (or possibly a 1/3 or a 1/4)
- Take full profit
- Do nothing
That means you do have choices and you can craft your trading plan, rules and style around your personality and comfort.
You can choose the trade management rules you want to have and how you are going to manage each market every single time.
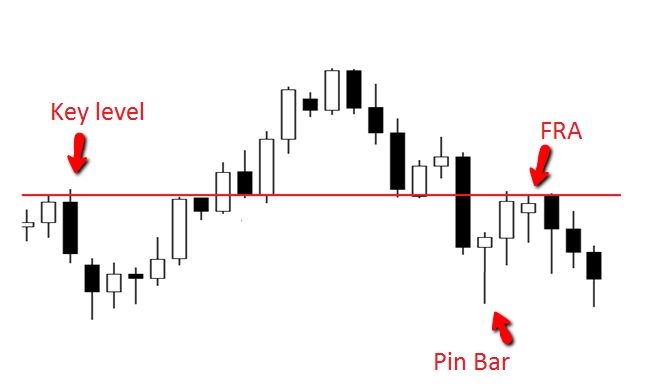
Examples of First Resistance Area
Below on the chart is bullish pin bar move higher and into resistance.
This first resistance area is a major area because it is a proven area in the past that has been respected multiple times. That immediately lets us know we need to manage our trade tightly when price gets to this area.
This is not just a minor one or two candle matching level. It is a FULL PRICE FLIP CONFIRMED RESISTANCE LEVEL and to make a trade into it and disregard it would not only be high danger, it would also be foolish.
Take note of how price turns around after reaching the FRA. The greedy trader who traded this pin bar would have been in a nice winning trade only to be stopped out. Smart traders on the other hand would have realised this area and would have either taken profit, moved to break even or a bit of both and could then possibly looked for further profits.
Chart Example:
 [/text_block][/op_liveeditor_element]
[op_liveeditor_elements][/op_liveeditor_elements]
[op_liveeditor_element data-style=””]

[/op_liveeditor_element]
[op_liveeditor_element data-style=””][text_block style=”style_1.png” align=”center” font_size=”25″ font_font=”Source%20Sans%20Pro” font_style=”bold”]
Module Ten
[/text_block][/op_liveeditor_element]
[op_liveeditor_elements][/op_liveeditor_elements]
[op_liveeditor_element data-style=””][text_block style=”style_1.png” align=”left” bottom_margin=”10″]Duration: 5 mins[/text_block][/op_liveeditor_element]
[op_liveeditor_element data-style=””][text_block style=”style_1.png” align=”left” bottom_margin=”10″]Module Progress:[/text_block][/op_liveeditor_element]
[op_liveeditor_element data-style=””]
[/op_liveeditor_element]
[op_liveeditor_element data-style=””]
[/op_liveeditor_element]
[op_liveeditor_element data-style=””][text_block style=”style_1.png” align=”center” top_padding=”6″]« Previous Lesson[/text_block][/op_liveeditor_element]
[op_liveeditor_elements][/op_liveeditor_elements]