
[op_liveeditor_element data-style=””]
LESSON: False Break Pin Bars
[/op_liveeditor_element]
[op_liveeditor_element data-style=””][text_block style=”style_1.png” align=”left” font_size=”16″ font_font=”Montserrat” font_color=”%237e7e7e”]
The best pin bars are often false breaks.
What I mean when I say false break is the nose of the pin bar moves through the key support or resistance level and makes a snap back through to create a “false break”.
The nose of the pin bar moving through the key support or resistance level is tricking the market into thinking the market is breaking out before snapping back the other way.
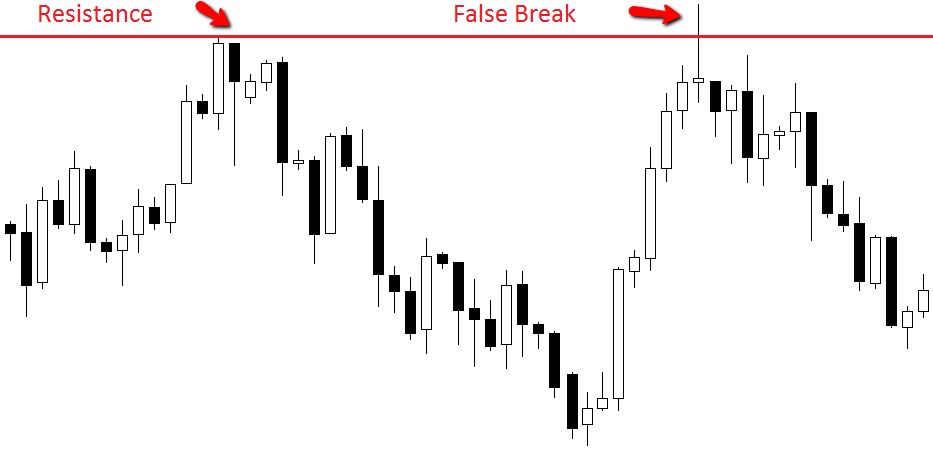
The pin bar false break can be a very high probability setup when played in the right circumstances. The chart below is an example of a bullish false break pin bar. This pin bar is making a false break of a key support level.
Chart Example #1:
Take note of how the pin bars nose moves below the support before snapping back above and moving higher.

Chart Example #2:
The chart below is an example of a bearish false break pin bar:
NOTE: Whilst this is an intro to the false break pin bar, I go into exactly how the False Break works and how you can use it in your trading including a tutorial video in Module 9 coming up in the course as the False Break is one of the most High Probability trading strategies we can deploy with any trigger.[/text_block][/op_liveeditor_element]
[op_liveeditor_element data-style=””][text_block style=”style_1.png” align=”left” font_size=”16″ font_font=”Montserrat” font_color=”%237e7e7e”]
Recap
Pin Bars are very good price action formations and can be super powerful.
It is CRUCIAL where you hunt and trade them from because not only will this increase your edge over the market for winning trades, but as you will learn coming up shortly, it will severely help your trade management!
Not all pins are created equal and not all pins will give you an edge.
Remember this… just because you see something work out in the market a few times and repeat itself does not mean you should trade it. The smallest and worst, most tiniest and rubbish pin bars will go on for huge winners sometimes and sometimes the most A+ pin bars will fail on us miserably.
You may see the exact same looking tiny candles work out and start thinking… ‘why am I not trading these smaller candles?’… And it is because you have not seen the 15 x losses in-between. You have noticed the two winners.
It is up to you as the business trader to only trade the A+ Pin Bars and to sit on your hands when the average pins present themselves.[/text_block][/op_liveeditor_element]
[op_liveeditor_elements][/op_liveeditor_elements]
[/custom_html][/op_liveeditor_element]
[op_liveeditor_elements][/op_liveeditor_elements]
[op_liveeditor_element data-style=””]

[/op_liveeditor_element]
[op_liveeditor_element data-style=””][text_block style=”style_1.png” align=”center” font_size=”25″ font_font=”Source%20Sans%20Pro” font_style=”bold”]
Module Six
[/text_block][/op_liveeditor_element]
[op_liveeditor_elements][/op_liveeditor_elements]
[op_liveeditor_element data-style=””][text_block style=”style_1.png” align=”left” bottom_margin=”10″]Duration: 10 mins[/text_block][/op_liveeditor_element]
[op_liveeditor_element data-style=””][text_block style=”style_1.png” align=”left” bottom_margin=”10″]Module Progress:[/text_block][/op_liveeditor_element]
[op_liveeditor_element data-style=””]
[/op_liveeditor_element]
[op_liveeditor_element data-style=””]
[/op_liveeditor_element]
[op_liveeditor_element data-style=””][text_block style=”style_1.png” align=”center” top_padding=”6″]« Previous Lesson[/text_block][/op_liveeditor_element]
[op_liveeditor_elements][/op_liveeditor_elements]
[op_liveeditor_element data-style=””]
Action Steps & Downloads / Links
[/op_liveeditor_element]
[op_liveeditor_element data-style=””]

Complete Module Test
[/op_liveeditor_element]
[op_liveeditor_elements][/op_liveeditor_elements]