
[op_liveeditor_element data-style=””]
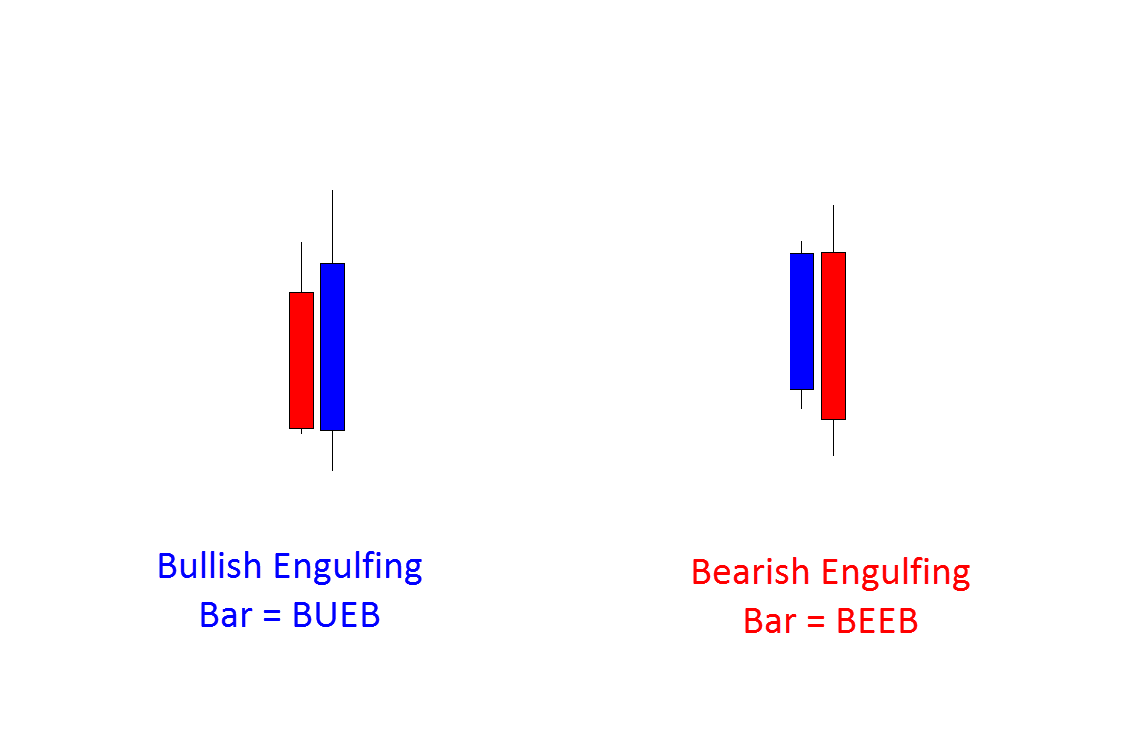
LESSON: Bullish and Bearish Engulfing Bar Structure
[/op_liveeditor_element]
[op_liveeditor_element data-style=””][text_block style=”style_1.png” align=”left” font_size=”16″ font_font=”Montserrat” font_color=”%237e7e7e”]Continuing on from the previous lesson, there are some basic criteria the engulfing bar MUST meet to be a valid setup.
I have included charts below to show and help you with this.
- Engulfing Bars must engulf the entire previous candle or bar
- Engulfing Bars can engulf as many bars as it likes as long as it engulfs a minimum of 1
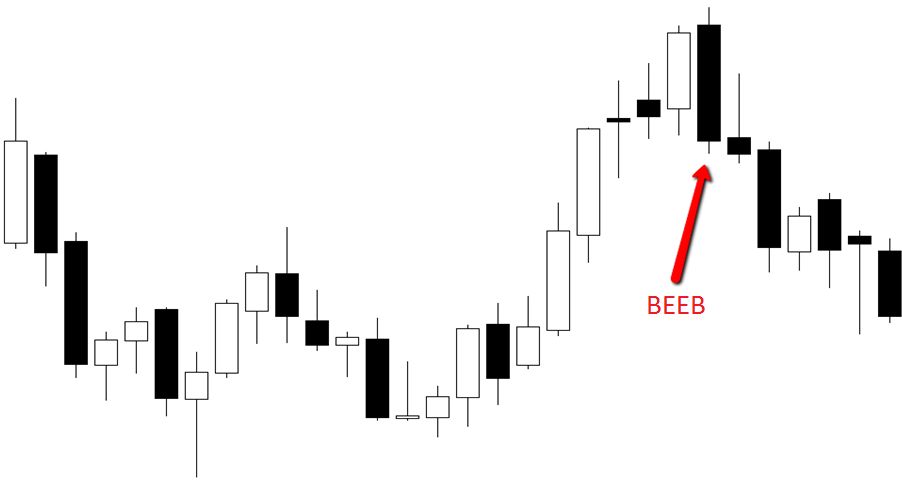
Example of Engulfing Bars:
For an Engulfing Bar to be tradeable it must form at a swing point.
This is very important. We must never take Engulfing Bars that form in the middle or at incorrect swing points. This is very important for an Engulfing Bar to be tradeable:
- Bullish Engulfing Bars must form at swing lows
- Bearish Engulfing Bars must form at swing highs
*You can read more about where exactly all reversal signals should form on the charts in the Reversals Section of the course.
Engulfing Bars are reversal signals and clearly show us that the market is ready to turn.
This is why it is so important that we only trade these bars in the correct area. If traders fail to trade these in the right area they will get burnt time after time and will not be using the full power of the engulfing bar to their advantage.
Momentum and Power Play
Engulfing bars should be large and commanding signals and not small and indecisive.
The reason the engulfing bar can be so reliable when used correctly is because of the momentum they bring behind their structure and order flow.
This is why it is key students stick to playing the large and commanding engulfing bars and not the small ones. You should try to remember; large candles equal large momentum. Don’t be afraid of this as this is what you are wanting and looking for!
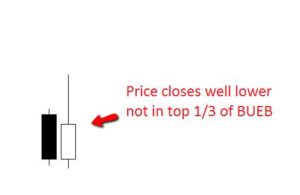
Example of an Engulfing Bar on a chart:
The best engulfing bars are the engulfing bars that close within the last 1/3 of the desired direction of the trade.
The reason for this is very simple. The wicks on candles represent rejection. Whenever a wick on a candle has been produced, it is there because price has moved into in an area and price has found support or resistance and price has bounced back either higher or lower and this has created the wick on the candle to be formed.
When we are entering engulfing bars we want to be entering the engulfing bars with the smallest wicks as possible for the simple reason that this means there is the smallest rejection as possible.
We obviously do not want to be entering a trade where there has been a previous support or resistance.
If we enter an engulfing bar with a large wick we run the risk of entering a trade that has shown a rejection of a support/resistance area and we could then enter straight into this same support/resistance area which is not a high probability play.
It is much better to enter the engulfing bars that close in the last 1/3 of their candles.
Chart Examples:
Below is an example of two BUEB’s.
The first chart shows how it closes in the top 1/3 of its candle and the other closes in the bottom 1/3 of its candle.
Traders should stick to trading the engulfing bars that close within the last 1/3 of the desired direction of their trade for the reasons mentioned above.
Chart #1:
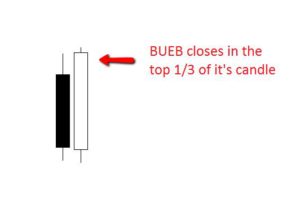
Chart #2:
 [/text_block][/op_liveeditor_element]
[op_liveeditor_elements][/op_liveeditor_elements]
[op_liveeditor_element data-style=””]

[/op_liveeditor_element]
[op_liveeditor_element data-style=””][text_block style=”style_1.png” align=”center” font_size=”25″ font_font=”Source%20Sans%20Pro” font_style=”bold”]
Module Seven
[/text_block][/op_liveeditor_element]
[op_liveeditor_elements][/op_liveeditor_elements]
[op_liveeditor_element data-style=””][text_block style=”style_1.png” align=”left” bottom_margin=”10″]Duration: 10 mins[/text_block][/op_liveeditor_element]
[op_liveeditor_element data-style=””][text_block style=”style_1.png” align=”left” bottom_margin=”10″]Module Progress:[/text_block][/op_liveeditor_element]
[op_liveeditor_element data-style=””]
[/op_liveeditor_element]
[op_liveeditor_element data-style=””]
[/op_liveeditor_element]
[op_liveeditor_element data-style=””][text_block style=”style_1.png” align=”center” top_padding=”6″]« Previous Lesson[/text_block][/op_liveeditor_element]
[op_liveeditor_elements][/op_liveeditor_elements]
[op_liveeditor_element data-style=””]
Action Steps & Downloads / Links
[/op_liveeditor_element]

[op_liveeditor_elements][/op_liveeditor_elements]