
[op_liveeditor_element data-style=””]
LESSON: Break Out with Engulfing Bar (BOEB)
[/op_liveeditor_element]
[op_liveeditor_element data-style=””][text_block style=”style_1.png” align=”left” font_size=”16″ font_font=”Montserrat” font_color=”%237E7E7E”]With the Breakout Engulfing Bar – BOEB it is super important that you use price to confirm that price has in fact broken out.
As with the first breakout method there are a few key rule changes that people will need to take note of.
Notes…
In this breakout method we are using the Engulfing Bar to get us into a trade. The key difference to other Engulfing Bars trades that have been taught is that in this breakout scenario they do not have to form at a swing high or low.
The important thing with the breakout Engulfing bar is that the Engulfing Bar is large and the close is in the correct area.
Please note the other major change is the entry type. When trading the Engulfing Bar as a breakout we are to always take entry when the Engulfing bar has been confirmed and had its high or low taken out by price. The breakout trade is not confirmed until this happens.
The best time frame to enter the BOEB is on the:
- Daily chart
- 4hr Chart
The first part of setting up for this trade is to identify an area for potential breakout. This has already been covered above and we use the same technique for this trading strategy.
However… as with every price action setup, basic, advanced and all in between – it is the story that makes the trigger signal and this is EVEN MORE SO for the breakout setups.
The level that price is breaking out of is crucial to your success. If you have a super obvious breakout level, you are already half way there! If the level is confusing, or you are unsure, then that is your answer about the setup right there.
Once we have identified a possible breakout setup we are looking for price to breakout strongly and form an engulfing bar. It is very important that the breakout engulfing bar is big and also commanding. The bigger the breakout candle the better the chance the trade has of working. The bigger the breakout bar the more orders there are to push price lower/higher and that’s exactly what we are looking for.
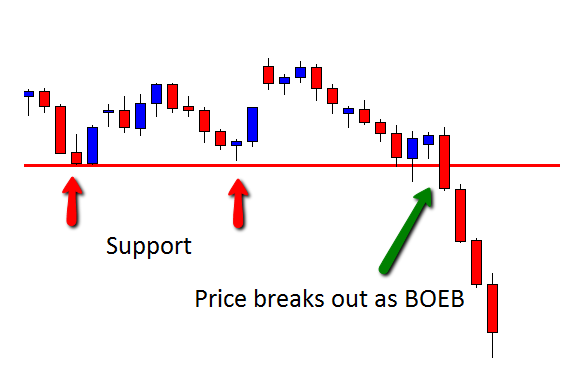
CHART EXAMPLE #1:
An example of price breaking out with an engulfing bar is below.
Another crucial factor with the breakout strategy is where the Engulfing Bar closes in relation to the LEVEL that price is breaking out from. You need to make sure the Engulfing bar closes outside of the breakout area. A close within the breakout area would mean price is yet to breakout and until price does move out the breakout is just a potential setup.
CHART EXAMPLE #2:
An example of price not closing out is below. Notice price formed a Bullish Engulfing Bar but the key was price did not close above the breakout resistance level.
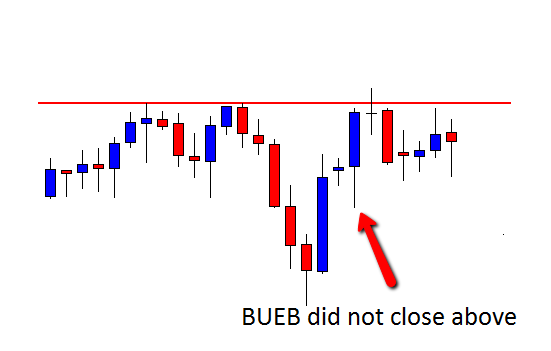
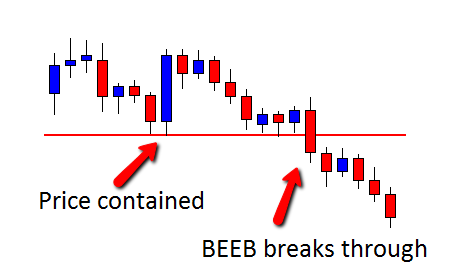
CHART EXAMPLE #3:
In this example below we can clearly see price form an Engulfing Bar that closes outside the breakout area. Entry was taken once price broke the low of the engulfing bar and price was then away!
The stop for this breakout method is the same as the BO1.
You have two options. You can either place the stop above/below the engulfing bar or you can simply put it above the old breakout area.
[/text_block][/op_liveeditor_element]
[op_liveeditor_elements][/op_liveeditor_elements]
[op_liveeditor_element data-style=””]

[/op_liveeditor_element]
[op_liveeditor_element data-style=””][text_block style=”style_1.png” align=”center” font_size=”25″ font_font=”Source%20Sans%20Pro” font_style=”bold”]
Module One
[/text_block][/op_liveeditor_element]
[op_liveeditor_elements][/op_liveeditor_elements]
[op_liveeditor_element data-style=””][text_block style=”style_1.png” align=”left” bottom_margin=”10″]Duration: 10 mins[/text_block][/op_liveeditor_element]
[op_liveeditor_element data-style=””][text_block style=”style_1.png” align=”left” bottom_margin=”10″]Module Progress:[/text_block][/op_liveeditor_element]
[op_liveeditor_element data-style=””]
[/op_liveeditor_element]
[op_liveeditor_element data-style=””]
[/op_liveeditor_element]
[op_liveeditor_element data-style=””][text_block style=”style_1.png” align=”center” top_padding=”6″]« Previous Lesson[/text_block][/op_liveeditor_element]
[op_liveeditor_elements][/op_liveeditor_elements]