
[op_liveeditor_element data-style=””]
LESSON: Managing Trades When Ranging
[/op_liveeditor_element]
[op_liveeditor_element data-style=””][text_block style=”style_1.png” align=”left” font_size=”16″ font_font=”Montserrat” font_color=”%237E7E7E”]In a ranging market price can be very likely to turn around and respect even the minor support and resistance areas.
Within the range there is always an extreme high and low. These areas are the keys. We never look and hope for the market to just breakout so when looking at these areas we are always looking to take profit on the assumption the area will hold and price will reverse or we can look to use them as area to protect profits we have already made.
Bounce – Tight Management
A ranging market is not a free flowing market and price will normally bounce around from level to level.
This can prove very tricky for trade management and going into these trades I am normally looking to manage the trade tightly.
An example of how I may manage a ranging trade is:
- Open two separate positions
- First position taken off at FRA/FSA and second position moved to break even
- Last position will be targeted at the high or low of the range
- I will not be looking for range to break and so will only have 2
This is a very simple trade management technique.
When trading into a range we have to be realistic about our trade expectations. We must also be aware that because price is not trending one way or another the chances of price turning at even the smallest support/resistance area are higher than other market types.
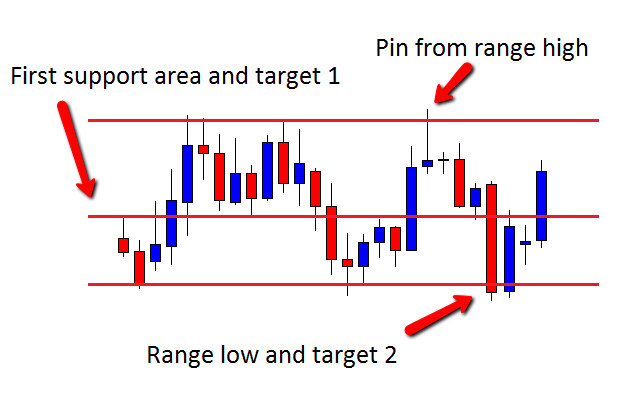
CHART EXAMPLE:
An example of a possible range trade is below. We have a well developed range and then a Pin bar formed at the range high. Using the trade management technique discussed above, the trader would take their first profit off at the first support area and move the second position to break even. Price nearly moves to the trader’s breakeven point before again going lower.
The trader would then have their final target set at the range low where price goes before moving higher back into the range again.
 [/text_block][/op_liveeditor_element]
[op_liveeditor_elements][/op_liveeditor_elements]
[op_liveeditor_element data-style=””]

[/op_liveeditor_element]
[op_liveeditor_element data-style=””][text_block style=”style_1.png” align=”center” font_size=”25″ font_font=”Source%20Sans%20Pro” font_style=”bold”]
Module Five
[/text_block][/op_liveeditor_element]
[op_liveeditor_elements][/op_liveeditor_elements]
[op_liveeditor_element data-style=””][text_block style=”style_1.png” align=”left” bottom_margin=”10″]Duration: 8 mins[/text_block][/op_liveeditor_element]
[op_liveeditor_element data-style=””][text_block style=”style_1.png” align=”left” bottom_margin=”10″]Module Progress:[/text_block][/op_liveeditor_element]
[op_liveeditor_element data-style=””]
[/op_liveeditor_element]
[op_liveeditor_element data-style=””]
[/op_liveeditor_element]
[op_liveeditor_element data-style=””][text_block style=”style_1.png” align=”center” top_padding=”6″]« Previous Lesson[/text_block][/op_liveeditor_element]
[op_liveeditor_elements][/op_liveeditor_elements]