
[op_liveeditor_element data-style=””]
LESSON: The 2 Bar Stop
[/op_liveeditor_element]
[op_liveeditor_element data-style=””][text_block style=”style_1.png” align=”left” font_size=”16″ font_font=”Montserrat” font_color=”%237e7e7e”]The 2 Bar Stop is a way to trail your stop once you are up in profit a fair way.
This is not something to be used when price is just looking to hit its first support or resistance area. It is something to be used when you have already taken profit on your first 2/3’s of your trade and you are just trying to ring the last little bit of remaining profit you can from the trade. This is my personal favorite way to scratch out the last remaining bits of profit.
Keep it Simple…
The 2 Bar Stop is a very simple formation. To use a 2 Bar Stop all a trader must do is trail their stop above or below the previous 2 bars to the current sessions bar.
CHART EXAMPLE #1:
For an example of this see below:
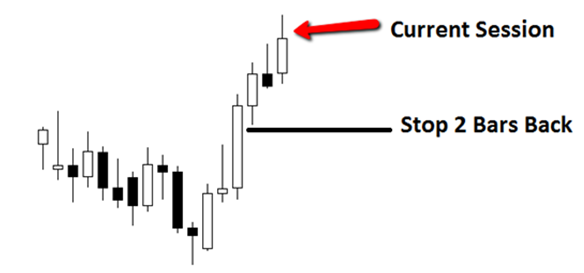
The best time to use the 2 bar stop is when a trade has been played within a strong trend and price is trending along nicely.
Using the 2 bar stop allows you to give the market room to breathe enough for a potentially much bigger move but at the same time locking in much needed profit.
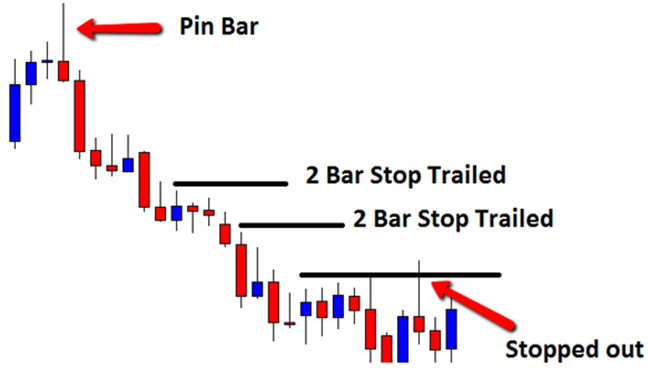
CHART EXAMPLE #2:
An example of how to use a 2 bar stop in a trade is below. You will see how a Pin Bar was formed at a swing high. Price then sold off heavily. The trader then would have been in a nice profit and been in a position to look to trail their stop. The 2 bar stop would have kept them in this trade for a long way.
 [/text_block][/op_liveeditor_element]
[op_liveeditor_elements][/op_liveeditor_elements]
[op_liveeditor_element data-style=””]

[/op_liveeditor_element]
[op_liveeditor_element data-style=””][text_block style=”style_1.png” align=”center” font_size=”25″ font_font=”Source%20Sans%20Pro” font_style=”bold”]
Module Four
[/text_block][/op_liveeditor_element]
[op_liveeditor_elements][/op_liveeditor_elements]
[op_liveeditor_element data-style=””][text_block style=”style_1.png” align=”left” bottom_margin=”10″]Duration: 5 mins[/text_block][/op_liveeditor_element]
[op_liveeditor_element data-style=””][text_block style=”style_1.png” align=”left” bottom_margin=”10″]Module Progress:[/text_block][/op_liveeditor_element]
[op_liveeditor_element data-style=””]
[/op_liveeditor_element]
[op_liveeditor_element data-style=””]
[/op_liveeditor_element]
[op_liveeditor_element data-style=””][text_block style=”style_1.png” align=”center” top_padding=”6″]« Previous Lesson[/text_block][/op_liveeditor_element]
[op_liveeditor_elements][/op_liveeditor_elements]