

Swing Points and the Keys to Reversal Setups
MODULE 5
[op_liveeditor_element data-style=””]
LESSON: Trading Reversal Signals
[/op_liveeditor_element]
[op_liveeditor_element data-style=””][text_block style=”style_1.png” align=”left” font_size=”16″ font_font=”Montserrat” font_color=”%237e7e7e”]All the setups / triggers in the course #1 are reversals. This means that we are entering the trade and then looking for price to reverse to make us a winner.
There are some absolute key factors we need to abide by to use reversal trigger signals as our edge over the market so we can ensure we are giving ourselves the very best chance of making the optimum entry point.
I have already spoken about trends, and major support and resistance, price flip, VBRN’s etc, and you are going to use these things in conjunction with what I am about to teach you to continue to build you overall price action story.
Further into the course you will learn more about the triggers themselves, how you can use entries, momentum, stops and then the best management in different types of markets to your advantage.
Before any of that and before you even make a trade, you need to have it set up and have found it at the correct spot which is the opposite of a lot of traders do.
The reason you are learning what you are learning in this order; levels, trends, flips, story, story and then the triggers and management is because you need to ‘setup’ the high probability level first and then it becomes a lot easier to just confirm with the A+ trigger signal.
When make a reversal trade you need to make sure you;
- Making trade from correct Swing High or Low
- Value Area – Pullback
- NOT and Extreme High or Low
- NOT a Sucker Pin or Sucker Profit Setup
- It has ‘Space’ to move into
Swing High or Low – Key to A+ Reversals
Still to this day the #1 factor I mention when helping students is swing points and correct swing high and low – especially with the pin bar.
Why is this so crucial and why is it so important that we play reversal setups from highs and lows and not just from anywhere?
The basics of price movement is simple – price moves up and price moves down. Or, price is consolidating / ranging. It never does any of these forever though.
Have a look at the bearish pin bar below for a moment of a good example; price moves up higher, it makes a rejection of higher prices (it pushes out and away and then sells of back lower), and then closes back below.
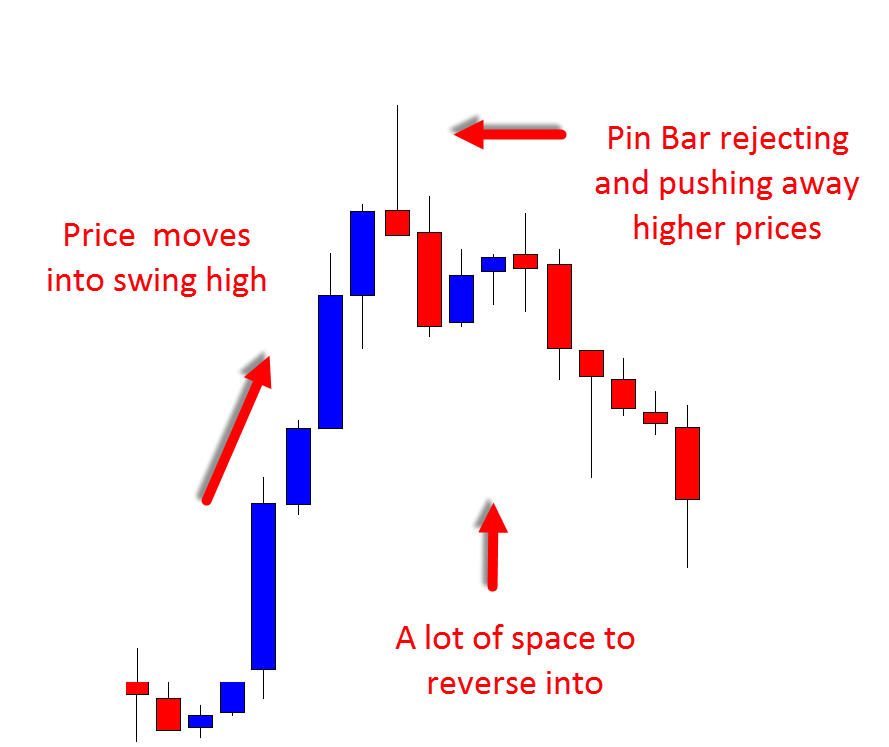
This does #3: major things:
1: Because it moved up into a swing high it activated a heap of bears/sellers who are now sending price lower.
2: Because price moved up higher it created a lot of space below so if we trade it we are not trading directly back into a support level which we would nearly always be doing if trading from incorrect swing point.
3: Price is able to break and reverse giving us space to manage our trade according to our plans.
If you look at the incorrect pin bar below you will see the major difference:
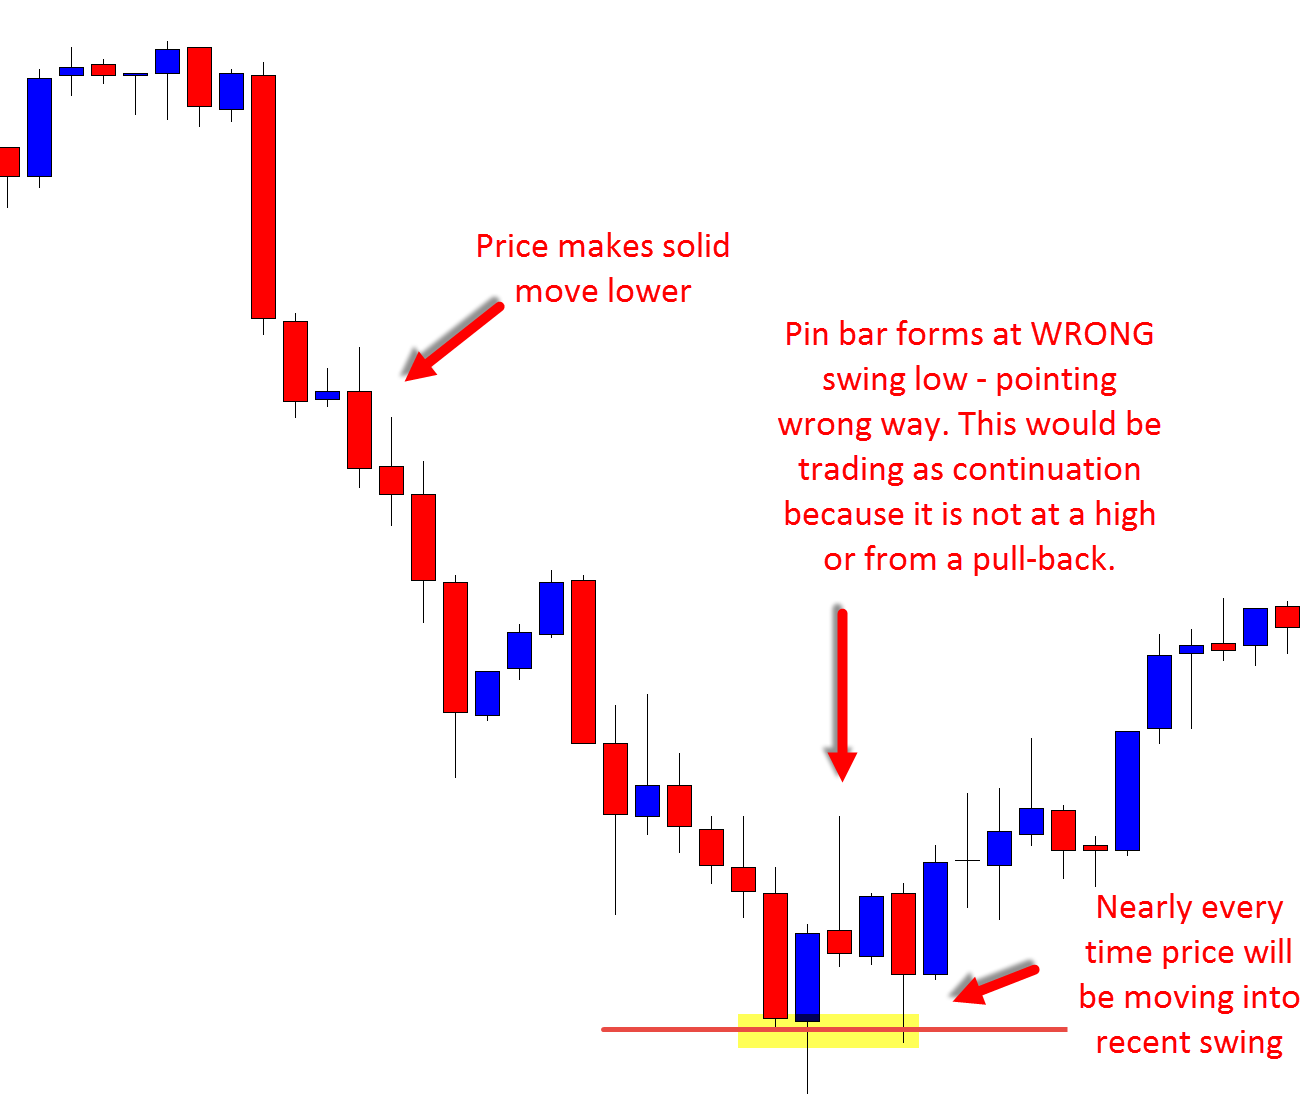
Notice how after this pin bar that is the incorrect swing point for a reversal breaks it is moving straight into a recent support level? This is what happens nearly every single time you make a trade from the wrong swing point area.
You are trading directly back into an area of big supply or demand and not away from it with a A+ trigger like you should be.
Trading a pin bar as a continuation or from the wrong swing point will hurt you if you don’t learn what they are and how to avoid them and swiftly!
It is in your very best interests.
YES – they will work from time to time. Of course they will. Everything and every candle works out in the market from time to time. The smallest and most rubbish candles break every which way, but we do not create an edge from them – remember this the next time that you see some rubbish pin bar play out you passed on and you knew you did the right thing!
We create our edge from a specific high probability trade set and when we see it we pounce every single time.[/text_block][/op_liveeditor_element]
[op_liveeditor_elements][/op_liveeditor_elements]
[op_liveeditor_element data-style=””]

[/op_liveeditor_element]
[op_liveeditor_element data-style=””][text_block style=”style_1.png” align=”center” font_size=”25″ font_font=”Source%20Sans%20Pro” font_style=”bold”]
Module Five
[/text_block][/op_liveeditor_element]
[op_liveeditor_elements][/op_liveeditor_elements]
[op_liveeditor_element data-style=””][text_block style=”style_1.png” align=”left” bottom_margin=”10″]Duration: 2 mins[/text_block][/op_liveeditor_element]
[op_liveeditor_element data-style=””][text_block style=”style_1.png” align=”left” bottom_margin=”10″]Course Progress:[/text_block][/op_liveeditor_element]
[op_liveeditor_element data-style=””]
[/op_liveeditor_element]
[op_liveeditor_element data-style=””]
[/op_liveeditor_element]
[op_liveeditor_element data-style=””][text_block style=”style_1.png” align=”center” top_padding=”6″]« Previous Lesson[/text_block][/op_liveeditor_element]
[op_liveeditor_elements][/op_liveeditor_elements]