
[op_liveeditor_element data-style=””]
LESSON: Example of Using Fibonacci With Stops
[/op_liveeditor_element]
[op_liveeditor_element data-style=””][text_block style=”style_1.png” align=”left” font_size=”16″ font_font=”Montserrat” font_color=”%237e7e7e”] The other way Fibonacci can be used is in our stop placement on candles that are very large.
The Price Action Course covered how to place stops above the 70% level on really big price action signals. To make this easier we use the Fibonacci tool to guide us and make it a lot more accurate.
This is an advanced technique and only advised for really large candles. 90% of the time the stop should be placed above the high or low to give your trade a chance to “breathe” and not be taken out by a whipsaw in price.
Trade management is KEY to success!
The decision making and decisions whilst actually in the trades will completely change for far better or worse how you end up.
Your entries are important, but if you get into a trade, cut it short and take profit too soon… or the next trade you get greedy and set a stop that is not there to be set and as a consequence get stopped out on a full loss that goes on to be a nice winner; it will begin to count.
Make it all count and pick them all wisely.
How to Actually Mark 70% Stop Loss Accurately and NOT Just Guess!
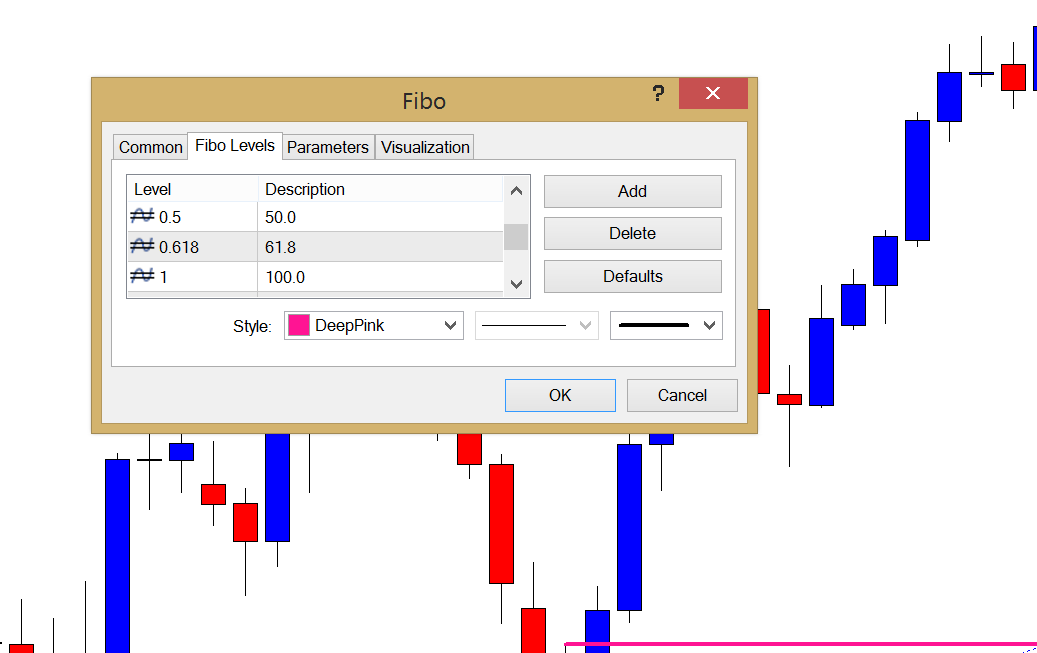
The best way to do this is to go into your ‘Fibonacci Tool’ in your MT4 or MT5 or whatever NY close charting platform you are using and change the settings to just add the 70% to the Fibo.
This way all the other levels will stay part of the tool, but you will now have one extra level and will be able to draw over the top of your trigger signal and find to the pip where it is your stop loss should go.
Or you can just put the level straight on price chart.
Below is the chart showing the MT4 settings open and adding a new level to the Fibo Tool.
Example #1:
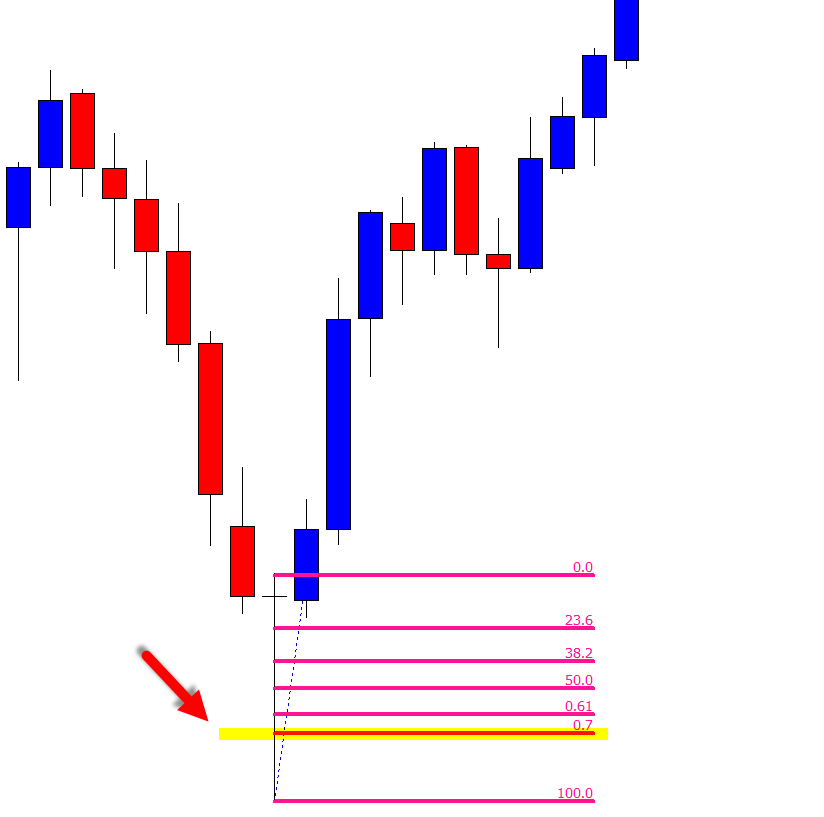
This is a Bullish Pin Bar with a huge wick or nose. To place a stop above this massive nose is just impractical so we would consider placing the stop above the 70% Fibonacci level.
We place the Fibonacci tool using the same method as with the swings – only this time we place the fibo right beside or right over it so we can be as accurate as possible. If you play around with the Fibo tool you will see it goes right in and out and big and small and all the colors . width change for you etc, to help you.
If we are trading short we start the Fibonacci from the high to the low as we are trading from the high to the low and vice versa for going long.
Fibonacci can be a useful tool to use when we don’t overdo it.
We are not going to look for Fibonacci levels in every market or trade. We only use the tool in the most obvious trends and pullback areas.
Quite often we can look to a daily chart and notice a very obvious swing occurring. Going to the 4hr chart we can then look for obvious levels for price to retrace. In this scenario placing the Fibonacci tool on the chart could act as another form of confluence for a possible trade, but this is confluence or another added factor in our favor.
I must stress Fibonacci is not to be used in its own and should only be used as another form of confluence when looking for possible trades.[/text_block][/op_liveeditor_element]
[op_liveeditor_elements][/op_liveeditor_elements]
[/custom_html][/op_liveeditor_element]
[op_liveeditor_elements][/op_liveeditor_elements]
[op_liveeditor_element data-style=””]

[/op_liveeditor_element]
[op_liveeditor_element data-style=””][text_block style=”style_1.png” align=”center” font_size=”25″ font_font=”Source%20Sans%20Pro” font_style=”bold”]
Module Nine
[/text_block][/op_liveeditor_element]
[op_liveeditor_elements][/op_liveeditor_elements]
[op_liveeditor_element data-style=””][text_block style=”style_1.png” align=”left” bottom_margin=”10″]Duration: 9 mins[/text_block][/op_liveeditor_element]
[op_liveeditor_element data-style=””][text_block style=”style_1.png” align=”left” bottom_margin=”10″]Module Progress:[/text_block][/op_liveeditor_element]
[op_liveeditor_element data-style=””]
[/op_liveeditor_element]
[op_liveeditor_element data-style=””]
[/op_liveeditor_element]
[op_liveeditor_element data-style=””][text_block style=”style_1.png” align=”center” top_padding=”6″]« Previous Lesson[/text_block][/op_liveeditor_element]
[op_liveeditor_elements][/op_liveeditor_elements]
[op_liveeditor_element data-style=””][text_block style=”style_1.png” align=”center” font_size=”16″ font_font=”Montserrat” top_margin=”15″]Action Steps & Downloads / Links
[/text_block][/op_liveeditor_element]
[op_liveeditor_element data-style=””]

Complete Module
Tests (8 & 9)
[/op_liveeditor_element]
[op_liveeditor_elements][/op_liveeditor_elements]